• Showing posts with label Blog. Show all posts
    Showing posts with label Blog. Show all posts

    New ! How To Add Post/Page Views Counter to Blogger

    As you know, Blogger not support display page and post views. Just Follow the steps -

    CLICK TO VIEW DEMO


    Now, click Save template and go to add the widget. 

    Note: if you want to reinstall or update widget, please remove the old one before add a new one. ]

    Installation


    Read More ->>

    How To Hide / Remove The Blogger Official Navigation Bar

    ဒီ ပုိ႔(စ္) ေလးကေတာ့ ဘေလာ့ဆုိဒ္ အေပၚက NavBar ျဖဳတ္နည္းေလးပါ။  ဘေလာ့ဆုိဒ္ ျမင္ကြင္းကုိ လွလွပပ ျမင္ေစခ်င္တဲ့သူေတြကေတာ့ ဒီ Official Navigation Bar ကုိ ျဖဳတ္ၾကပါတယ္။ မျဖဳတ္လည္း ဘာျပႆနာမွမျဖစ္ပါဘူး။ ျဖဳတ္ရင္ေတာ့ ဘေလာ့ဆုိဒ္ျမင္ကြင္းပုိသန္႔ၿပီးလွတာေပါ့ေနာ္။
    ၁။Sign In Blogger

    ၂။ Template

    ၃။ Edit HTMl

    ၄။ Proceed

    ၅။ ေအာက္က Cond ေလးကုိရွာပါ။Ctrl + F ကုိတြဲနုိပ္၍ရွာပါ ၊ ရွာရလြယ္ပါတယ္။

    view plainprint?
    1. ]]></b:skin>  

    ေတြ႔ၿပီးဆုိရင္ ]]></b:skin> ရဲ႕အေပၚမွာ ေအာက္က Cond ေလးကုိ ထပ္ထည့္ေပးလုိက္ပါ။

    view plainprint?
    1. #navbar-iframe {display: none !important;} 


    ထည့္ၿပီးရင္ Save Template ကုိ နုိပ္လုိက္ပါ။ ၿပီးရင္ မိမိဘေလာ့ဆုိဒ္ ကုိဖြင့္ၾကည့္ပါ။

    Read More ->>

    Recent Posts By Label Gadget For Blogger

    Step 1. In your Blogger Dashboard click > Design > Edit Html 


    Step 2 . Find the following piece of code in your blogs Html : (Click Ctrl and F for a search bar to help find the code - More Info)

    ]]>

    Step 3. Copy and paste the following code Directly Above / Before ]]>

    /*** Recent Labels Gadget Css ***/
    img.label_thumb{
    float:left;
    padding:5px;
    border:1px solid #8f8f8f;
    background:#D2D0D0;
    margin-right:10px;
    height:55px;
    width:55px;
    }
    img.label_thumb:hover{
    background:#f7f6f6;
    }
    .label_with_thumbs {
    float: left;
    width: 100%;
    min-height: 70px;
    margin: 0px 10px 2px 0px;
    adding: 0;
    }
    ul.label_with_thumbs li {
    padding:8px 0;
    min-height:65px;
    margin-bottom:10px;
    }
    .label_with_thumbs a {}
    .label_with_thumbs strong {}

    Step 4. Find the following piece of code in your blogs Html : (Click Ctrl and F for a search bar to help find the code - More Info

    /head

    Step 5. Copy and paste the following code Directly Above / Before

    script type='text/javascript'>
    //<![CDATA[
    function labelthumbs(json){document.write('
      ');for(var i=0;iif(entry.link[k].rel=='alternate'){posturl=entry.link[k].href;break;}}var thumburl;try{thumburl=entry.media$thumbnail.url;}catch(error)
      {s=entry.content.$t;a=s.indexOf("var postdate=entry.published.$t;var cdyear=postdate.substring(0,4);var cdmonth=postdate.substring(5,7);var cdday=postdate.substring(8,10);var monthnames=new Array();monthnames[1]="Jan";monthnames[2]="Feb";monthnames[3]="Mar";monthnames[4]="Apr";monthnames[5]="May";monthnames[6]="Jun";monthnames[7]="Jul";monthnames[8]="Aug";monthnames[9]="Sep";monthnames[10]="Oct";monthnames[11]="Nov";monthnames[12]="Dec";document.write('
    • ');if(showpostthumbnails==true)
      document.write('');document.write(''+posttitle+'
      ');if("content"in entry){var postcontent=entry.content.$t;}
      else
      if("summary"in entry){var postcontent=entry.summary.$t;}
      else var postcontent="";var re=/<\S[^>]*>/g;postcontent=postcontent.replace(re,"");if(showpostsummary==true){if(postcontent.lengthelse{document.write('');postcontent=postcontent.substring(0,numchars);var quoteEnd=postcontent.lastIndexOf(" ");postcontent=postcontent.substring(0,quoteEnd);document.write(postcontent+'...');document.write('');}}
      var towrite='';var flag=0;document.write('
      ');if(showpostdate==true){towrite=towrite+monthnames[parseInt(cdmonth,10)]+'-'+cdday+' - '+cdyear;flag=1;}
      if(showcommentnum==true)
      {if(flag==1){towrite=towrite+' | ';}
      if(commenttext=='1 Comments')commenttext='1 Comment';if(commenttext=='0 Comments')commenttext='No Comments';commenttext=''+commenttext+'';towrite=towrite+commenttext;flag=1;;}
      if(displaymore==true)
      {if(flag==1)towrite=towrite+' | ';towrite=towrite+'More »';flag=1;;}
      document.write(towrite);document.write('
    • ');if(displayseparator==true)
      if(i!=(numposts-1))
      document.write('');}document.write('
    ');}
    //]]>

    Step 6. Save your template, we have added the Css to style the gadget and the script to make the gadget work.Now we just have to add the gadget code to your sidebar in a Html/Javascript gadget.

    Step 7. Click back to your Design Page > Click Add A Gadget > Choose Html/Javascript from the pop up menu :


    Step 8. Copy and paste the code below into the Html/Javascript gadget.

    script type='text/javascript'>var numposts = 3;var showpostthumbnails = true;var displaymore = false;var displayseparator = false;var showcommentnum = false;var showpostdate = false;var showpostsummary = true;var numchars = 80;


    Important - You must add the name of the label you want to to the above code.Replace LABEL in red with the label name.

    Example - If i wanted to display posts from the gadgets label i would replace LABEL withGadgets.
    (http://www.spiceupyourblog.com/search/label/Gadgets/)

    If your label is made up of more than one word it can get confusing as the space between the words will be filled automatically as shown below :

    http://www.spiceupyourblog.com/search/label/Social%20Media 

    If you are going to use a label with more than one word make sure to first see how the label appears.

    Step 9. Save the gadget and you can drag and drop it into the position you want it displayed on your blog.

    Drop Your Comments, Views And Opinions Below.
    Read More ->>

    Blogger Trick: How To Post HTML Codes


    If you have a blog theme tutorial learn about blogs, you definitely have to post someHTML Codes. For Beginner Blogger, may get a little error when publishing the post. Because the post to include some of the HTML code does not write like a normal way. So to enter HTML code in the Post, we have to change some of the code. Here I will explain to you some code that should be changed.
    Before we start, please understand these codes with the descriptions in the list below.


    Before (Original)
    After (Changed)
    Description
    <
    <
    Marks the beginning of code lines
    >
    &gt;
    Marks the end of the cover code
    &
    &
    Mark of "and"
    "
    "
    Mark of double quotes
    ±
    ±
    Mark of plus minus
    Space
     
    Mark of space
    ©
    ©
    Mark of copyright
    ®
    ®
    Mark of Registered


    For example:

    This is your original code that you wanna post:

    Blogger Trick Blog


    To post, you must change the code to be like this:

    <br/><br/>

    <code>

    <a href="http://bloggertrick4u.blogspot.com/" target="_blank">Blogger Trick Blog</a>

    </code>


    This tag <code> and </code> is for show your HTML code on your post. But don't forget to change the code as the table above. How? Do you understand? If you do not understand about this post, please leave your comment or question under this page. Good luck.
    Read More ->>

    How To And Where To Upload .swf Files ?


    How To Upload SWF Object

    • First go to Google Sites.
    • Sign In/Sign Up to your account.
    • Click On Sidebar.

    • Click on Attachments Tab and  hit the Upload the button.


    • Upload your file.


    • After uploading successfully you will see View And Download links just right click on download link and select the copy link address.


    Now you have the link for your uploaded SWF File.

    UPDATE - Your Uploaded SWF File Link will look like this :

    https://sites.google.com/site/yoursite/24049.swf?attredirects=0&d=1

    Remove the text after ? sign.

    Now your link will look like this

    https://sites.google.com/site/yoursite/24049.swf

    Now copy the link and you are done...

    What Next?

    In next post I will provide embed code generator so that you can easily use your flash file in your blog.Just wait and watch....

    I hope you will surely like this tutorial.If you think that this post is helpful then don't forgot to share it with your friends.Thanks... :) Have a nice day...

    Read More ->>

    Recent Comments Widget with Rounded Images for Blogger


    recent comments widget
    Iam trying to complete the blogger comment series from many days but the time won't allowing me to do it. Now a days i am spending maximum hours for blogging and i am trying to launch my second blog too which is related toWordPress plugins and even optimizing few low quality blog posts of this blog. In single word, I am totally messed up with all these together, but I am still trying to serve my best. I really apologize for taking lot of time to complete this post and i can understand that many of my blog readers like you is eagerly waiting for regular posts as i used to do regular posting from the beginning of this blog.

    Regular posting have became quite difficult task now. But obviously lot of surprises on the way pals, kindly stay updated. OK lets move on with today's post.

    Today I am going to give you perfect working recent comments widget for your blogger blog that could really help you in getting more number of comments. In fact, at the beginning of this blog, i didn't had any commentators here, now the time have rolled out and you can notice lot of new commentators involving here everyday and I am even trying to help them at my level best. This recent comments widget really became an advantage for me to notify my blog visitors about the conversations going on every blog posts. OK enough talks now, the live demo of this widget with rounded official looking author images can be easily noticed on my blog's sidebar and hope you know its advantage. Let us move on with the tutorial now.

    1. Go to blogger dashboard --> Layout --> Add a Gadget [ Html / JavaScript ].

    2. Copy the peace of code given below.

    Recent Comments Widget code

    <style type="text/css">
    /*recent comments widget by bloggertricks.biz*/
    ul.latest_recent_comments{
    list-style:none;
    margin:0;
    padding:0;
    }
    .latest_recent_comments li{
    background:none !important;
    margin:0 0 6px !important;
    padding:0 0 6px 0 !important;
    display:block;
    clear:both;
    overflow:hidden;
    list-style:none;
    }
    .latest_recent_comments li .avatarImage{
    padding:3px;
    background:#fefefe;
    -webkit-box-shadow:0 1px 1px #ccc;
    -moz-box-shadow:0 1px 1px #ccc;
    box-shadow:0 1px 1px #ccc;
    float:left;margin:0 6px 0 0;
    position:relative;
    overflow:hidden;
    }
    .avatarRound{
    -webkit-border-radius:100px;
    -moz-border-radius:100px;
    border-radius:100px;
    }
    .latest_recent_comments li img{
    padding:0px;
    position:relative;
    overflow:hidden;
    display:block;
    }
    .latest_recent_comments li span{
    margin-top:4px;color: #666;
    display: block;
    font-size: 12px;
    font-style: italic;
    line-height: 1.4;
    }
    .latest_recent_comments span{
    display:none;
    }
    </style>
    <script type="text/javascript">
    //<![CDATA[    // Recent Comments Settings    var numComments  5, showAvatar  = true, avatarSize  = 60, roundAvatar = true, characters  = 30, showMorelink = true, moreLinktext = "More �", defaultAvatar  = "http://www.gravatar.com/avatar/?d=mm", hideCredits = true;//]]></script>
    <script type="text/javascript" src="https://bloggertricksdotbiz.googlecode.com/svn/js/recent%20comments.js"></script>
    <script type="text/javascript" src="http://www.bloggertricks.biz//feeds/comments/default?alt=json&callback=latest_recent_comments&max-results=6"></script>

    Note:-
    • Change numComments = to your desired number.
    • Replace bloggertricks.biz with your blog Url.

    3. Save the gadget and then Save the Layout.


    That's It pals..... Now go to your blog and view the official recent comments widget showing recent comments with commentators image rounded. Hope you like this one. . :) Kindly leave your feedback and opinion about this. Take care...
    Read More ->>

    Use Automatic Read More Jump Break With Thumbnail On Blogger


    Blogger Read More Automatic
    On Blogger you have the option to add a jump break to your posts, so the posts will be displayed with just a short summery on the home page and a link to read the full post will be below.The jump break has a number of great advantages, if you display full posts on your home page it will severely slow down the load time, Also With the jump break in place visitors that land on your home page will see a selection of your posts without the need to scroll.It's also more professional looking and as visitors have to click through to the full post it increases page views.

    In this Blogger Tip i have a script that will automatically turn your posts into read more summary's on your blogs home page with a few added extras.Here are some of the features of an auto Read More along with a live demo :

    - Your posts will automatically be displayed as short summary's with a read more link.
    - An image from the post will be re sized into a thumbnail and displayed beside the summery.
    - You can choose how much text is displayed in the summery.
    - You can choose the size of the thumbnail.
    - All Previous posts will also have the jump break so you don't need to go through your archive adding it.

    Live Demo - I have added the code to a test blog using the Simple Template from the Blogger template designer and you can see it here - Auto Read More Demo.

    The script is used on Most Magazine Templates i publish on my Blogger Templates Site so i thought why not make it available on all blogs ? As well as posts having the jump break on your home page it will also be used on your label pages and archive pages.

    Update 07 June 2011 - I have improved this code so your static pages will display properly.With other versions of this code your static pages will have the read more added but will not open when clicked.Now your pages will display fully without the read more jump break.Update helped with thanks to Harish from Way2Blogging.

    If you added the old code you will need to replace it with the updated code.To see exactly what you need to replace you can see the old code here with instructions.

    Add Auto Read More Post Summary's To Your Blog


    Step 1. In Your (New Design) Blogger Dashboard Click The Drop Down Menu For Your Blog > Choose Template > Then Edit Html > Now Proceed > Tick The Expand Widget Templates Box as shown in the video Below :

    Step 2. Find the following piece of code in your blogs Html : (Click CTRL and F for a search bar to help find the code - More Info)

    </head>

    Step 3. Copy the following code and paste it Directly Above / Before </head>

    <script type='text/javascript'>
    var thumbnail_mode = "no-float" ; 
    summary_noimg = 430;
    summary_img = 340;
    img_thumb_height = 120;
    img_thumb_width = 120;
    </script>
    <script type='text/javascript' src='http://bloggerblogwidgets.googlecode.com/files/auto_readmore_blogger.js' ></script>

    Important 

    The code in red sets how the post summary's are displayed.Remember if a post has an image it will be re sized into a thumbnail to be displayed beside the summery.If the post does not have an image just a text summery will be displayed.

    summary_ noimg= 430; --> The length of the summery if the post does not have a thumbnail.
    summary_img = 340; --> The length of the summery if there is an image in the post that will be converted into a thumbnail.
    null_thumb_height = 120; --> The height in pixels of the thumbnail.
    null_thumb_width = 120; --> The width in pixels of the thumbnail.

    Step 4. Find the following piece of code in your blogs Html : (Click CTRL and F for a search bar to help find the code - More Info)

    <data:post.body/>

    Step 5Replace <data:post.body/> With The Code Below

    <b:if cond='data:blog.pageType == &quot;item&quot;'>
    <data:post.body/>
    <b:else/>
    <b:if cond='data:blog.pageType == &quot;static_page&quot;'>
    <data:post.body/>
    <b:else/>
    <div expr:id='&quot;summary&quot; + data:post.id'>
    <data:post.body/>
    </div>
    <script type='text/javascript'>
    createSummaryAndThumb(&quot;summary<data:post.id/>&quot;);
    </script>
    <div style='clear: both;'/>
    <span class='rmlink' style='font-weight:bold;padding:5px;float:right;text-align:right;'><a expr:href='data:post.url' >Read more ... </a></span>
    </b:if>
    </b:if>

    Note - You can change the text in red from Read More to "Continue Reading", "Read Full Post" or anything you like.

    Note 1. You should try to have the first image in your posts as close to square as possible so they work well when used as thumbnails on your home page.Images that are for example rectangle in shape will appear distorted when they are re sized.I use a version of this script on this blog and always add an image at the top of the posts that are close to square, then size then wont make a big impact on the appearance.Remember it's the first image in each post that is used as a thumbnail.

    Step 6. Save Your Template.

    That's it for this Blogger tip, All your posts including all archived posts will now be displayed with a summary and read more on your home page, labels pages and archive pages.Check out more of our Blogger Tips and Blog Gadgets.

    Did you know you can use a Jump Break In Your Full Feed ?

    Drop Your Comments, Views And Opinions Below.
    Read More ->>

    How to Reset Your Blog

    If you are having problems with blogger, and things aren't working quite right. You may be able to fix the problem by resetting your blog.

    By resetting your blog will not lose you any posts you made.
    How to Reset Your Blog

    The first thing you need to look at is the current layout of your blog, it will be either one which you have a template tab or one on which you have a layout tab.
    Template Tab Blog


    If you have a blog that when you go into your dashboard and blog you see the tabs and links shown above, the posting, setting and template links. To reset your blog you do the following


    1. Click on the Template link from your dashboard or Template tab from your blog.


    2. Click on the Customise Design tab


    3. Click on the Upgrade Your Template button in the middle of the screen


    4. Select a new template from the templates on screen and click on the save template button

    Your blog will now change to show you page elements and give you tabs for posting, settings and layout.

    Your blog is now reset and you can continue posting as normal.


    Layout Tab Blog


    If you have a blog that has a posting, settings and layout links on the dashboard or tabs on your blog like those aboe. To reset your blog you do the following.

    1. Click on the layout link from the dashboard or tab in your blog


    2. Click on the Edit HTML tab


    3. Near the bottom of the screen, under the box with the HTML code in it you will see a link that says Revert to Classic Template, click it.

    4. You will get a popup appear, click OK


    You will now see that the you have a template tab in place of the layout tab, this means you have successfully reset your blog

    Your blog is now reset and you can continue posting as normal.

    Read More ->>

    How To Change Older Post And Newer Post Link


    Someone had asked Kang Rohman about how to hide Older Post or Newer Post in blogger, and Kang Rohman had answered the question by posting an article titled “Hiding Older Post and Newer Post Link”. The other question that relates with “Older Post and Newer Post” is asked again, the question as follow:
    Hello,
    I am wondering if you can change the words “newer” and “older” to the next and previous post’s titles-I have a screenshot of a blog that has this if you email me I can send it.
    Thanks
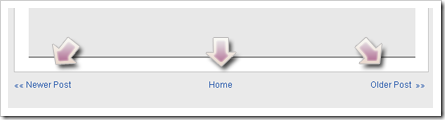
    olderpost
    Is this your question? OK, Kang Rohman will try to answer. The word Older Post or Newer Post can certainly be changed as you want, for example, changed with “Next” or “Previous”, even the words not only can be changed with other words but also can be changed with images or icons. Let’s examine one by one.

    Changing Older Post and Newer Post with Next and Previous
    Follow the steps below:
    1. Log in to blogger with your ID
    2. Click Layout
    3. Click Edit HTML tab
    4. Click “Download Full Template”, please back up first your template (important)
    5. Please check the small box beside Expand Widget Template
      expand
    6. Wait for a while until the process finished
    7. Find the following code on your template:
      <span id='blog-pager-newer-link'> 
           <a class='blog-pager-newer-link' expr:href='data:newerPageUrl' expr:id='data:widget.instanceId + &quot;_blog-pager-newer-link&quot;' expr:title='data:newerPageTitle'><data:newerPageTitle/></a> 
           </span> 
         </b:if>
         <b:if cond='data:olderPageUrl'> 
           <span id='blog-pager-older-link'> 
           <a class='blog-pager-older-link' expr:href='data:olderPageUrl' expr:id='data:widget.instanceId + &quot;_blog-pager-older-link&quot;' expr:title='data:olderPageTitle'><data:olderPageTitle/></a> 
           </span> 
         </b:if>
         <b:if cond='data:blog.homepageUrl != data:blog.url'> 
           <a class='home-link' expr:href='data:blog.homepageUrl'><data:homeMsg/></a> 
           <b:else/> 
           <b:if cond='data:newerPageUrl'> 
             <a class='home-link' expr:href='data:blog.homepageUrl'><data:homeMsg/></a> 
           </b:if> 
         </b:if>
    8. Look at the code in red printed.
    9. Change the code <data:newerPageTitle/> with the word Next and the code <data:olderPageTitle/> with the word Previous
    10. Click Save Template button
    11. Finished
    It’s simple, right?

    Changing Older Post and Newer Post with Icon
    To change Older Post and Newer Post with icon, the first step is preparing the icon which you want to use. For example Kang Rohman has the icons like this:
    Next  home previous
    Please upload the icons you have to a server that you usually use to place an image, and note the URL address. For example Kang Rohman has the icons’ URL address as follow:
    https://blogger.googleusercontent.com/img/b/R29vZ2xl/AVvXsEjaiyMCVV79YVW5U_c3i15jljE_KSNSD0nwwpTl-bOC6MxYiytKGFKBgoj9eLC0afxCjGL8ytp8dchsF5JQ9QpRASOEAHRbriNYHiqgkVQB0PLz43IACZVo3PckSsQRNzNzNqjZH8AdRGU/?imgmax=800
    https://blogger.googleusercontent.com/img/b/R29vZ2xl/AVvXsEiImNtByTRt5pJTm6_jdq1YbCa5DvKf_jGWLfCYdwVq040ahI73XWLtebId6QvPMNfohEWUeHiWyZN4y_HLI33glZwWxfPZvHlBIzCVfZj0Bnc3ybjVTSXcCuk0TaGA9FwggcHUOwj4r-g/?imgmax=800
    https://blogger.googleusercontent.com/img/b/R29vZ2xl/AVvXsEiTcirCNlo-7XVAlAAt5l1RDfv9uUkIlbtSFYsfsFKtcERjlJX0Yb3CwuJzMJ0q6S7YKZY0S6tAZ4vojtt0UENfp91Ngn_12iE5Fic21aSS1Urc6R1TGV5XkS1Yac-kjHjlGmplWLAOBYo/?imgmax=800

    Change the above code into like this:
    <img alt='Next' border='0' src='https://blogger.googleusercontent.com/img/b/R29vZ2xl/AVvXsEjaiyMCVV79YVW5U_c3i15jljE_KSNSD0nwwpTl-bOC6MxYiytKGFKBgoj9eLC0afxCjGL8ytp8dchsF5JQ9QpRASOEAHRbriNYHiqgkVQB0PLz43IACZVo3PckSsQRNzNzNqjZH8AdRGU/?imgmax=800' title='Next'/>
    <img alt='previous' border='0' src='https://blogger.googleusercontent.com/img/b/R29vZ2xl/AVvXsEiImNtByTRt5pJTm6_jdq1YbCa5DvKf_jGWLfCYdwVq040ahI73XWLtebId6QvPMNfohEWUeHiWyZN4y_HLI33glZwWxfPZvHlBIzCVfZj0Bnc3ybjVTSXcCuk0TaGA9FwggcHUOwj4r-g/?imgmax=800' title='previous'/>
    <img alt='home' border='0' src='https://blogger.googleusercontent.com/img/b/R29vZ2xl/AVvXsEiTcirCNlo-7XVAlAAt5l1RDfv9uUkIlbtSFYsfsFKtcERjlJX0Yb3CwuJzMJ0q6S7YKZY0S6tAZ4vojtt0UENfp91Ngn_12iE5Fic21aSS1Urc6R1TGV5XkS1Yac-kjHjlGmplWLAOBYo/?imgmax=800' title='home'/>
    If you have had the code as above, the next step is to place it on your template code, here are the ways:
    1. Log in to blogger with your ID
    2. Click Layout
    3. Click Edit HTML tab
    4. Click “Download Full Template”, please back up your template first (important)
    5. Please check the small box beside Expand Widget Templates
      expand
    6. Wait for while until the process finished
    7. Find this code on your template:
      <span id='blog-pager-newer-link'> 
           <a class='blog-pager-newer-link' expr:href='data:newerPageUrl' expr:id='data:widget.instanceId + &quot;_blog-pager-newer-link&quot;' expr:title='data:newerPageTitle'><data:newerPageTitle/></a> 
           </span> 
         </b:if>
         <b:if cond='data:olderPageUrl'> 
           <span id='blog-pager-older-link'> 
           <a class='blog-pager-older-link' expr:href='data:olderPageUrl' expr:id='data:widget.instanceId + &quot;_blog-pager-older-link&quot;' expr:title='data:olderPageTitle'><data:olderPageTitle/></a> 
           </span> 
         </b:if>
         <b:if cond='data:blog.homepageUrl != data:blog.url'> 
           <a class='home-link' expr:href='data:blog.homepageUrl'><data:homeMsg/></a> 
           <b:else/> 
           <b:if cond='data:newerPageUrl'> 
             <a class='home-link' expr:href='data:blog.homepageUrl'><data:homeMsg/></a> 
           </b:if> 
         </b:if>
    8. Look at the code in red printed
    9. Change the code <data:newerPageTitle/><data:olderPageTitle/>, and <data:homeMsg/> with your icon code. E.g.
      <span id='blog-pager-newer-link'> 
           <a class='blog-pager-newer-link' expr:href='data:newerPageUrl' expr:id='data:widget.instanceId + &quot;_blog-pager-newer-link&quot;' expr:title='data:newerPageTitle'><img alt='Next' border='0' src='https://blogger.googleusercontent.com/img/b/R29vZ2xl/AVvXsEjaiyMCVV79YVW5U_c3i15jljE_KSNSD0nwwpTl-bOC6MxYiytKGFKBgoj9eLC0afxCjGL8ytp8dchsF5JQ9QpRASOEAHRbriNYHiqgkVQB0PLz43IACZVo3PckSsQRNzNzNqjZH8AdRGU/?imgmax=800' title='Next'/></a> 
           </span> 
         </b:if>
         <b:if cond='data:olderPageUrl'> 
           <span id='blog-pager-older-link'> 
           <a class='blog-pager-older-link' expr:href='data:olderPageUrl' expr:id='data:widget.instanceId + &quot;_blog-pager-older-link&quot;' expr:title='data:olderPageTitle'><img alt='previous' border='0' src='https://blogger.googleusercontent.com/img/b/R29vZ2xl/AVvXsEiImNtByTRt5pJTm6_jdq1YbCa5DvKf_jGWLfCYdwVq040ahI73XWLtebId6QvPMNfohEWUeHiWyZN4y_HLI33glZwWxfPZvHlBIzCVfZj0Bnc3ybjVTSXcCuk0TaGA9FwggcHUOwj4r-g/?imgmax=800' title='previous'/></a> 
           </span> 
         </b:if>
         <b:if cond='data:blog.homepageUrl != data:blog.url'> 
           <a class='home-link' expr:href='data:blog.homepageUrl'><img alt='home' border='0' src='https://blogger.googleusercontent.com/img/b/R29vZ2xl/AVvXsEiTcirCNlo-7XVAlAAt5l1RDfv9uUkIlbtSFYsfsFKtcERjlJX0Yb3CwuJzMJ0q6S7YKZY0S6tAZ4vojtt0UENfp91Ngn_12iE5Fic21aSS1Urc6R1TGV5XkS1Yac-kjHjlGmplWLAOBYo/?imgmax=800' title='home'/></a> 
           <b:else/> 
           <b:if cond='data:newerPageUrl'> 
             <a class='home-link' expr:href='data:blog.homepageUrl'><data:homeMsg/></a> 
           </b:if> 
         </b:if>
    10. Click Save Template button
    11. Finished
    The example of the result will be like this:
    olderpost
    If you get error messages when editing the template, please try using a different browser
    Good luck!

    Read More ->>

    ဒိမွာ member လုပ္ရင္ Join this Site ကုိနွိက္ၿပိး Email ႏွင့္ယင္ပါ